
Wilting squash can have several causes, including other pests or growing conditions. Identification and regular inspection are more useful than assuming all wilting means squash bugs. Young nymphs and hidden adults can present different management challenges, but adults are not universally immune to every insecticide.

Identification and conditions
Identify the source and conditions
Identification
Distinguish bugs, eggs and other causes of wilt.
Leaf undersides
Inspect for correctly identified clusters.
Plant stage
Consider vulnerability and pollination needs.
Shelter
Inspect appropriate old crop debris.
Methods ranked by their role
Choose management for the actual problem
Inspection
Detect confirmed pests early.
Careful removal
Remove identified bugs and eggs without needless plant injury.
Suitable exclusion
Use covers only with a pollination plan.
Targeted labeled control
Consider crop-safe use and pollinator restrictions.
Inspection and prevention steps
Inspect leaf undersides gently
Confirm egg clusters and nymphs with reliable identification. Remove confirmed eggs carefully without prescribing tape that damages every leaf. Recheck as local activity warrants; a fixed twice-weekly schedule is not a clearance guarantee.

Check an early crop cover
Fit suitable exclusion only after checking the crop is free of enclosed pests. Provide necessary pollination at flowering. Do not assume leaving a closed cover over blooming cucurbits is harmless.

Remove suitable old crop debris
Use gloves and manageable tools after harvest. Dispose of diseased material as appropriate and avoid disturbing beneficial habitat unnecessarily. Sanitation reduces shelter but does not promise eradication.

Document plant damage and insects
Photograph for extension advice when identification is uncertain. If treatment is needed, select a product for that crop, pest and use and follow harvest and bee precautions. Avoid unsupported soap recipes and claims that every adult is untreatable.

Sequence and reassessment
A sequence for ongoing management
Identify
Confirm the target and damage.
Prevent
Address the relevant access or growing conditions.
Manage
Use appropriate mechanical or label-permitted methods.
Monitor
Check recurrence and obtain local advice when needed.
Myths and facts
Correct common management assumptions
Myth: all squash wilt is squash bugs
Fact: identify the cause.
Myth: adults are immune to all products
Fact: control difficulty is not universal immunity.
Myth: covered flowering crops never need pollinators
Fact: preserve required pollination.
Myth: detergent is a standard crop pesticide
Fact: use appropriate permitted methods.
Use plant damage and life stage to guide follow-up
Egg clusters, nymphs, adults, and wilted cucurbit vines call for different monitoring decisions. Seeing one adult does not establish the size of the problem, and plant collapse can have causes other than squash bugs.
Inspect leaf undersides and lower stems at regular intervals, record which plants are affected, and compare new damage. Ask an extension service to confirm the insect or diagnose rapidly declining plants before increasing treatment.
How to get rid of squash bugs by life stage
The most useful inspection separates eggs, small nymphs and adults. “Bugs on zucchini” is too broad a diagnosis for selecting a treatment. Start with one affected plant, inspect both leaf surfaces and lower stems, then compare it with a nearby plant that looks healthy. Take a clear photograph before removing uncertain insects.
Identify adults, bronze eggs and gray nymphs
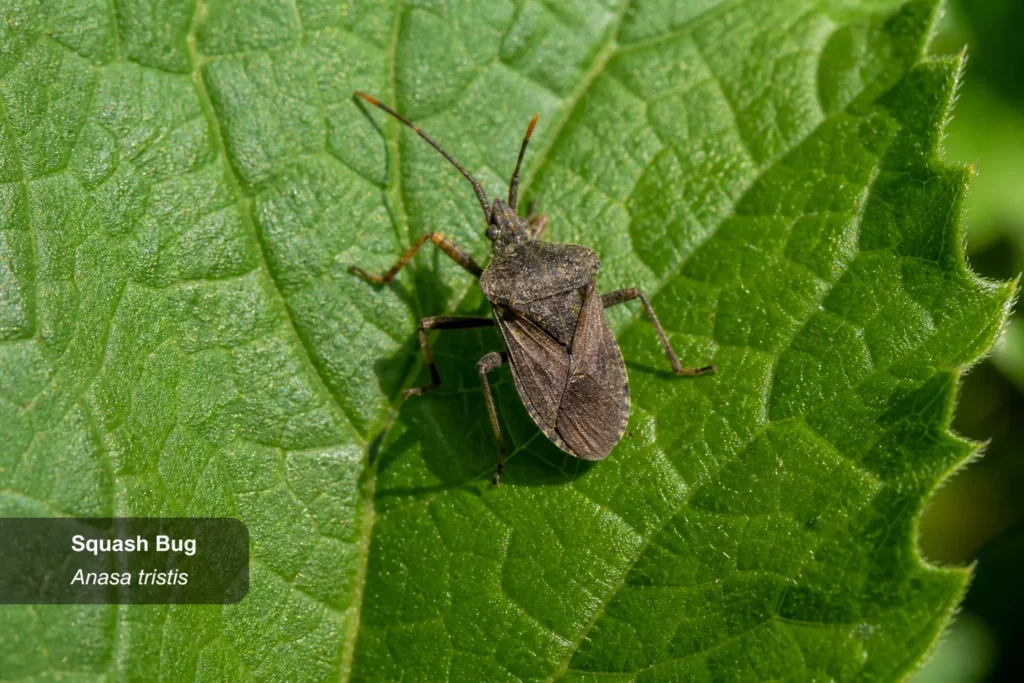
The squash bug, Anasa tristis, is a flattened brownish insect associated with cucurbits. Bronze-colored egg clusters often occur beneath leaves. Young nymphs change appearance as they develop and can gather on the plant. Use the combination of insect appearance, eggs and host plant, not a common name such as “stink bug” alone. Minnesota Extension provides identification photographs.
Bring a small container of soapy water for insects you have correctly identified and can safely collect. This is a disposal method for removed bugs, not permission to spray detergent on the crop. For eggs, support the leaf while removing the cluster; discard a badly damaged leaf only if the plant can tolerate the loss. Recheck that plant rather than assuming one pass removed all stages.
Squash bug or squash vine borer?
Squash bugs feed on plants; squash vine borers develop inside stems. Sudden wilting and material resembling sawdust near a damaged stem base warrant a separate borer check. Water stress, disease and root problems can also cause decline. A spray chosen for a visible bug does not resolve every cause of a collapsing vine. Compare Minnesota’s vine-borer guidance.
A practical monitoring routine for zucchini, squash and pumpkins
Adult squash bugs can overwinter in sheltered places and return to vulnerable cucurbit crops. At the end of the season, review crop residue and hiding places near the bed, then plan early inspection for the next planting. Summer squash, winter squash, pumpkins and cucumber plantings should be identified precisely when you check a treatment label. One generic “vegetable” recommendation does not cover every crop use.
Make the inspection easy enough to repeat. Check the same plants, note where you find eggs and record whether new feeding damage is appearing. An egg cluster you removed yesterday and an adult you find today are different observations; keeping that distinction prevents you from judging a method by the wrong life stage.
- Early growth: inspect young plants before fitting a cover. Enclosing an existing infestation defeats the purpose of exclusion.
- New egg clusters: remove confirmed eggs promptly and look again beneath adjacent leaves.
- Small nymphs: concentrate management before they become harder-to-control adults.
- Flowering: check pollination access before maintaining a closed cover.
- After harvest: remove suitable crop residue and record which beds had recurring activity.
A board placed near affected plants can help you find sheltering squash bugs when you lift it and inspect beneath. It becomes useful only if you actually check it and remove confirmed pests. An unattended board is shelter, not a self-running control system. UC IPM describes this mechanical approach alongside hand removal. Read UC IPM’s management guidance.
Do row covers help once squash starts flowering?
Covers are preventive barriers, not treatment for bugs already inside. Most commonly grown squash needs pollination to set fruit. Decide how pollinators will reach flowers before keeping a cover in place. If you remove it for pollination, inspect again afterward; the uncovered crop can become accessible to pests too.
Do not use a calendar promise such as “leave the cover on for one month” for every variety and climate. Flowering and plant condition determine the decision. Use breathable crop material, secure its edges appropriately, and check that it is not damaging expanding leaves or creating unsuitable growing conditions.
Organic control and insecticides: what changes the decision?
“Organic” is not a guarantee that a product will control an adult squash bug or spare every beneficial insect. Match the product to the crop, target pest and life stage. Hand removal and exclusion can be reasonable starting points for a small planting; severe activity across many plants may need local extension advice on a labeled option.
Why timing and coverage matter more than a stronger mixture
Small nymphs are generally a more workable target than established adults. A treatment also has to reach the insects where they are hiding. Increasing the concentration because adults remain is not a safe substitute for correct timing or application. Follow the label’s rate, interval and maximum use restrictions.
Before treating an edible crop, check these separate directions: crop listing, pest listing, preharvest interval, application method and bee precautions. A product for an ornamental plant is not automatically suitable for zucchini you will eat. Insecticidal soap is a formulated pesticide; dish detergent is not an interchangeable garden recipe. EPA explains what the pesticide label controls.
Neem oil, diatomaceous earth and companion plants
Do not choose these from a generic list of natural bug killers. Check whether the exact product and evidence fit squash bugs on your crop. Dust placed where insects never contact it will not fix hidden feeding, and repeated oil applications can damage plants if used against directions. Companion plants may diversify a garden, but they are not proof that an existing infestation will disappear.
Protect flowering plants and pollinators during any permitted treatment. Avoid drifting spray onto neighboring blooms. “Apply at night” does not override a label restriction or ensure that a residue is harmless the next morning. See EPA’s pollinator-protection resources.
Frequently asked questions about squash bugs
Can I save a wilted squash plant?
First determine why it wilted. Check soil moisture, visible insects and the stem base, then ask extension to assess an uncertain or rapidly declining plant. Removing squash bugs cannot reverse every injury. Keep caring for salvageable plants while preventing avoidable exposure of healthy ones.
Does removing eggs once solve the problem?
No. You may miss clusters or encounter new adults later. Repeated inspection is part of the method. Mark the checked plants and note the date so that you can distinguish fresh egg laying from a cluster you overlooked earlier.
Will crop rotation keep them out next year?
Rotation is useful planning but is not an impenetrable barrier to mobile adults. Combine bed planning with residue management and early inspection. When choosing squash varieties, check local advice on susceptibility; a less susceptible variety still needs monitoring.
Should I trap-crop another squash variety?
Beneficial predators also belong in the inspection picture. Do not remove every small insect you see near squash bug eggs. Clear photographs and local identification advice help separate the pest from an insect feeding on it. UC IPM lists predators and discusses why hidden eggs and bugs complicate spray coverage; indiscriminate treatment can undermine that useful distinction.
A trap crop concentrates monitoring and management; it is not a plant you can abandon beside the main crop. Unless you can inspect and control pests on it, the extra planting may become another unmanaged source. For a small garden, start with a routine you can reliably maintain.
Publishing and affiliate notes
Some product links may be affiliate links. If you buy through them, we may earn a commission at no extra cost to you. Product picks are not lab tests. Read the legal disclaimer.